
When trying to access your webcam on a website in Safari on your Mac, you may see an error message stating that Safari would like to access your camera. This means that Safari needs your permission before it can use your Mac’s built-in or external webcam.
Allowing Safari access to your camera is easy to do. Here is a step-by-step guide:
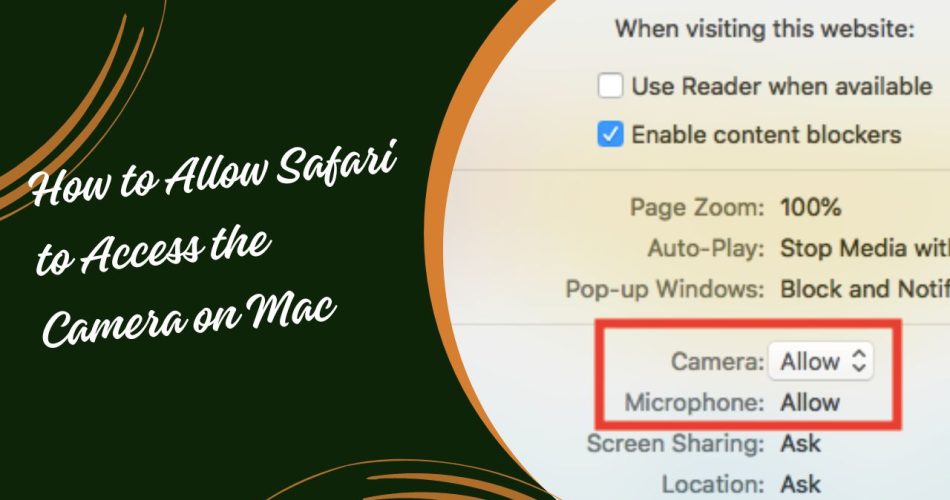
Check Safari Camera Permissions
- Open Safari on your Mac
- Click on the Safari menu in the top toolbar
- Select Preferences
- Click on the Websites tab
- In the left sidebar, click on Camera
- Look for the website domain name that you want to allow camera access for under the “Currently Open Websites” section on the right side
- If the website is listed, make sure the dropdown menu next to it is set to Allow
- If the website is not listed, change the “When visiting other websites” dropdown menu to Allow
Allow Camera Access for a Website
If you did not see the website listed under Currently Open Websites, you will need to open the website in Safari first before granting access.
Here is how to allow a specific website to use your camera in Safari:
- Open Safari and go to the website you want to allow camera access for
- A popup will appear asking if you want to allow the website to access your camera. Click Allow or OK
- If the popup does not appear, click on the Safari menu => Settings for This Website
- Under the Camera section, change the dropdown menu from Deny to Allow
- Refresh the Safari page
The website should now have permission to access your Mac’s camera in Safari.
Allow Camera Access in System Preferences
You can also manage which apps have permission to use your Mac’s camera through System Preferences:
- Click on the Apple menu => System Preferences
- Select Security & Privacy
- Click the Privacy tab
- In the left sidebar, select Camera
- Check or uncheck apps to allow or deny access to the camera
- Quit and relaunch Safari for changes to take effect
Use an External Webcam
If you are trying to use an external webcam instead of your Mac’s built-in camera, you will need to select it as the input camera source in Safari:
- Connect your external webcam and install any required software
- Open Safari and go to a website that needs camera access
- Click Safari in the menu bar and select Enter Full Screen
- Click on the camera icon in the toolbar to access camera settings
- Select your external webcam from the Camera dropdown menu
- Click Done
The website should now use your external webcam as the video input source instead of the built-in camera.
Safari Camera Not Working on Website
If Safari has permission to use your camera but it is still not working on a website, here are some things you can try:
- Allow microphone access as well in Safari settings
- Make sure no other app is using the webcam currently
- Try allowing camera access while on the website directly by clicking the camera icon in the Safari address bar
- Enable cookies and JavaScript for the site
- Use a different browser like Chrome or Firefox
- Contact the website support for camera issues on their end
Final Words
Enabling camera permissions in Safari is necessary for websites and web apps that need access to your webcam. By following the steps outlined in this guide, you can easily grant permission for Safari to use your Mac’s camera. Checking Safari settings, allowing access through System Preferences, and troubleshooting common problems will help get your camera working properly on websites. With the right permissions set, you can then use your Mac’s built-in camera or an external webcam for all your web conferencing, live streaming, and website camera needs.