
Today, signing up for subscriptions to apps, services, and content is easier than ever. With just a few taps on your iPhone, you can access everything from streaming music and movies to food delivery and cloud storage. However, with so many subscriptions available, it’s easy to pile up charges you no longer want or need.
Fortunately, canceling subscriptions on your iPhone is a straightforward process. Here’s how to easily cancel any subscription right from your device.
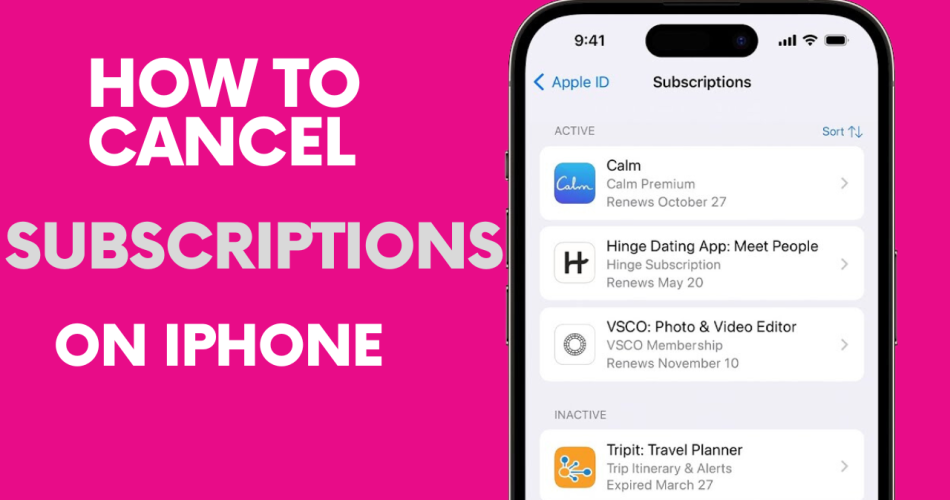
Step #1: Locate the Subscriptions Section in Settings
The first step is accessing your Subscriptions page in the Settings app. To get there:
- Open the Settings app on your iPhone.
- At the top of the screen, tap on your Apple ID name.
- On the next screen, select Subscriptions.
This will display a list of all your active subscriptions associated with your Apple ID account.
Also check: How to Use YouTube Vanced on iOS?
Step #2: Identify the Subscription to Cancel
Carefully review the list of subscriptions to identify any you want to cancel. The entries will display important information, including:
- The service name
- Billing interval (monthly, annually, etc)
- Renewal date
- Price per period
Make sure you do not accidentally cancel any subscriptions you want to keep active.
Step #3: Tap to Cancel the Subscription
Once you have identified a subscription to cancel:
- Tap on the subscription entry to open details.
- Scroll down and tap Cancel Subscription.
A confirmation prompt will appear to make sure you want to cancel.
Step #4: Confirm the Cancellation
After tapping Cancel Subscription, a popup will ask you to confirm cancelling. Carefully review the details again before proceeding.
To finalize, tap Confirm to complete cancelling the subscription.
The subscription should now show as cancelled with the date it will remain active until after your next billing cycle.
Check Other Platforms
Remember to also cancel the subscription directly with the service if you signed up on their website or app instead of through your Apple ID. The iOS cancellation only applies to subscriptions using your Apple account.
Review your bank statements over the next billing cycles to ensure no further charges occur. Contact the company directly if you see any issues.
Keep Track of Cancellations
It’s easy to forget what subscriptions you’ve cancelled as time passes. Make a list of cancelled subscriptions and review it periodically to ensure you no longer see charges. This is how you can easily take control of subscriptions and avoid paying for services you no longer use. Carefully monitoring charges and cancellations will help maximize value from the many subscription options available for your iPhone.