
Wi-Fi Calling is an incredibly useful feature on iOS that allows you to make and receive phone calls over a Wi-Fi network when you have little or no cellular coverage. All major carriers in the US support Wi-Fi Calling, so you can take advantage of this feature regardless of your carrier.
Here is a step-by-step guide on how to set up and enable Wi-Fi Calling on your iPhone or iPad running iOS:
Requirements
Before enabling Wi-Fi Calling, make sure:
- You are running iOS 11.2 or later on your iPhone or iPad
- Your carrier supports Wi-Fi Calling. Most major carriers in the US and many international carriers support this.
Check: How to Change Snooze Time on iPhone
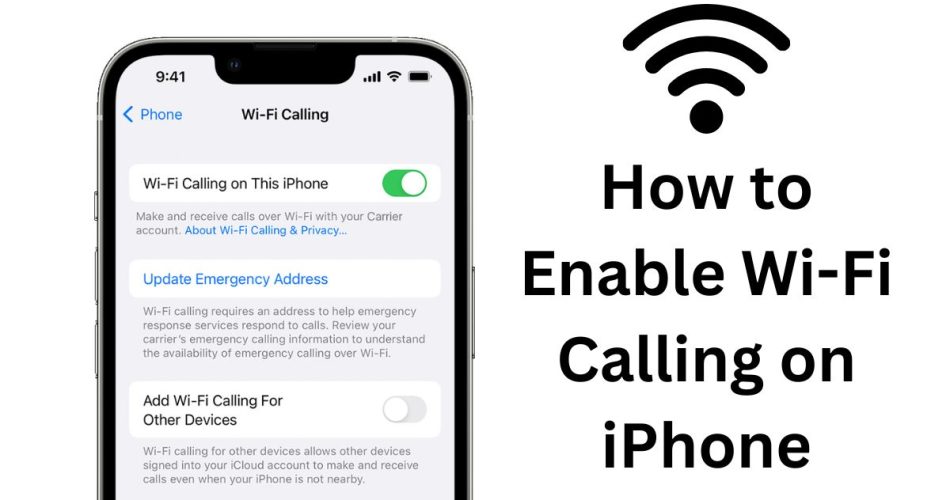
How to Enable Wi-Fi Calling
- Open the Settings app on your iPhone or iPad
- Tap on “Cellular” or “Phone”
- Select “Wi-Fi Calling”
- Toggle on “Wi-Fi Calling on This iPhone”
- Tap “Enable” on the prompt
You may be asked to enter an emergency address at this point for 911 services to locate you if you ever need to call emergency services while connected only to Wi-Fi.
After enabling Wi-Fi Calling, you will see “Wi-Fi” next to your carrier name in the status bar whenever you are connected to a Wi-Fi network. This indicates that calls will now be routed over Wi-Fi automatically.
How to Use Wi-Fi Calling
Once enabled, using Wi-Fi Calling to make or receive calls is seamless. Whenever you are connected to a Wi-Fi network with a poor cellular signal, your calls will be routed over Wi-Fi automatically.
As soon as you disconnect from the Wi-Fi network or move into an area with good cellular coverage, your calls will switch back to the cellular network. The switching happens automatically in the background.
To force your phone to only use Wi-Fi for calling, you can enable Airplane mode which disables cellular connections. Just remember to disable Airplane mode again when you want to resume using the cellular network.
How to Enable Wi-Fi Calling on Other Devices
You can also enable Wi-Fi Calling on other Apple devices like your iPad, Apple Watch, or Mac. This allows you to make and receive calls on those devices even when your iPhone is not nearby, as long as you are connected to a Wi-Fi network.
To do this:
- On your iPhone, go to Settings => Phone => Wi-Fi Calling
- Turn on “Add Wi-Fi Calling For Other Devices”
- Go back and tap on “Calls on Other Devices”
- Turn on “Allow Calls on Other Devices”
- Enable Wi-Fi Calling individually on each device you want to allow calls
Once enabled, you will be able to seamlessly make and receive Wi-Fi calls from your other Apple devices as long as they are connected to the internet over Wi-Fi.
Read: iOS erafn.org: How to Install Project Era on iPhone to get Fortnite
How to Fix Wi-Fi Calling Not Working
If you are unable to enable Wi-Fi Calling or are facing issues making Wi-Fi calls, here are some things you can try:
- Restart your iPhone
- Make sure Wi-Fi Calling is enabled in Settings
- Check if your Wi-Fi connection is working properly
- Try toggling Airplane mode on and off
- Contact your carrier’s customer support for assistance
Conclusion
Wi-Fi Calling is an incredibly useful feature that provides call connectivity even with poor cellular signals. With the steps above, you can easily enable this feature on your iPhone, iPad and other Apple devices. The calls will automatically switch between Wi-Fi and cellular for a seamless calling experience.